Wednesday, October 31, 2012

Happy Halloween

Happy Halloween everyone, is this not the best?  This is from Design Seeds, one of my favorite blogs for color reference, some days just wander through the blog for color inspiration, some of the most beautiful scenes and colors.  Have a safe one with your friends and family, hugs

The Project - Final Color for Covers

Close Up of the Final Color

The final color is done and I am very happy with it.  There is some technique to this but there is also a certain luck of the draw and I was definitely lucky with this pull of colors.  This card will have movement and pop, so on to the hows.


 I used Dylusion Ink Spray for the final process of color and 91percent rubbing alcohol.  There is Bubble Gum Pink, Pure Sunshine, and Crushed Orange.  If you have not played with these sprays, this is INTENSE color, a little goes a long way.
The masking tape this time provided my boundries for the color, I was not concerned with the paper warping, it is a very fast drying medium and you are not going directly to the paper, spraying the colors in places within the boundries.  When the colors are sprayed then a layer of alcohol is sprayed over the entire surface which gets all those colors dancing.  Then it is time to lay the sheet ontop of the colors and press firmly over the entire sheet.


Also notice that I did not pull out the wrinkles in the plastic, I wanted those to be part of the rythum and movement on the paper.


 This is the first sheet pulled, there was still plenty of color after the pull, so I spritzed it one more time with the alcohol.
This is the 2nd pull, yeah, the covers have their color.  You will probably be doing this in a much smaller scale, when I do this with my card stock, I let it dry for about an hour and then I scan it in, I do not usually use the original as my card background. 

Happy Halloween, hope all your tricks are few and your treats many, hugs


Tuesday, October 30, 2012

The Project-Color begins for covers

This is the 2nd stage of 3, finished for the cover colors

Good Morning, for those of you in the North and other states in the path of Hurricane Sandy, I hope that you are safe and incurred minimum damage from her havoc, I keep you in my prayers.
Yesterday, was not scheduled for the cover colors, but there is rain predicted for later in the week and I needed a non-humid, warm day, and yesterday was it, I need one more today to finish the color.  For those of you that make cards and love techniques, here is a short tutorial on the process.

For a normal sized card, I use my table inside and a spray box or open spray folder for this process, but this 22"X30" card called for a little bit more real estate, so outside we went.  If you look to the left you will see one of my challenges for this project, his name is Cass and he is an outside cat, believes with all his heart that the front patio is his and his alone, what ever goes on there must be for his benefit or amusement.  This table is my potting table, paint table, stripping furniture table, it gets a lot of use.  So for this project it got a hefty dose of plastic, I then used the painters tape to mount both sheets to the top.  The tape serves 2 purposes, it keeps it from blowing away if there is a breeze and it also helps to keep the project flat while drying.  When you apply the paint the paper swells with the absorbtion of water and if it is not held down it will bow and warp as it dries. My first coat of paint is acyrlic that I sprayed from a fine mist spray bottle and then brushed out with a foam brush.


After the spraying with acrylic the paper needs to dry completely, you can see in the above picture the bowing and warping of the paper as it dries.  You want the splatters and patches to get the end result.  If you are using card stock it will dry quicker and if you are impatient you can take a rubber stamp heat gun to it.  When the paper is completely dry, I then do a process with a rubber stamp background and gesso, I have several unmounted background stamps specifically for this process.

 I keep a dozen or so of these foam brushes on hand, you can generally find them at the hardward store for about 50cents each.  I also always have gesso on hand, it is one of my favorite studio tools.
 I will be using the stamp bowed as you see it here, I want to avoid the edges as much as possible and just want the white swirls in patches randomly across the paper.
As you can see I load the stamp moderately and this will give me 3 or 4 images, I work from the left corner down and across the sheet.  When using gesso with your stamps, it is important to wash that stamp immediately following the process, dried gesso on your stamps is not good for them and is a bear to get off after it has dried.  If for some reason it does dry on your stamp, soak in a warm bath of dishwasher soap and then take an old tooth brush the remove the softened gesso.

The final step in this first process is to let the gessoed paper dry completely and then with a fine grid sandpaper, sand the entire sheet, this will raise the tooth on the paper and pit some of the gessoed area. If you are doing this process with cardstock, you want to sand very lightly as the cardstock is much thinner, it is best to do a small test sheet first, so that you are able to watch how the sand paper raises the top layer of your cardstock.  This is preparing the paper for the final step, which is applying the alcohol inks.  The alcohol inks will give depth and added color plus it will add a warmth to the paper.
Thanks to all who are following and I hope that maybe I have shared some techniques for you to try with your projects, hopefully tomorrow we will have the final stage completed and the covers will have their color, have a wonderful day, hugs

Monday, October 29, 2012
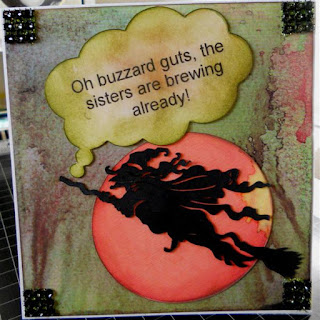
BBTB2 - Witch Fun

Welcome, Monday, BBTB2 Challenge - Witches, oh my!  Come join us for some great inspiration this Monday, our very talented Susan put Witches on our slate for today.  Please visit our challenge site and then come play with us, my pretties.  Remember your focal cut must be made with the Cricut Cart.  Our simple challenge rules appear at the top of the Challenge Site, now on to the Witches.
My card is 6"X6", I used one of my very favorite background designs for this Halloween, I used Dylusion and Tim Holtz Inks and Distress Inks for the background.  The big blood moon was also done with Dylusion inks.  The word bubble was created with my Cameo.  This is my very favorite Cricut Witch and she is from the Oct31st cart, I love her movement and that broom, well I just love her! lol.  I used some of my faux webbing jewels for the corners and a little green glitter.

So looking forward to seeing what haunting little witch you use and what you do with her.  I watched Hocus Pocus twice this weekend to get me in the mood, okay I watched it cause I love it.  Hugs

Saturday, October 27, 2012

Project-elements coming together

I was not going to post today, but I have been up and working since 3AM and the elements are starting to come together, there of course will be more pages, that will just be a matter of resizing and cutting (the hard part is done), on the right and left side are pages that will be flying with no words, I hope you can see, you might need to click on the picture and it will take you to a larger size, there are 2 stacks of books and in the middle is a standing open book, all of these will be cut multiple times to give them dimension, there is a bookmark inside the standing book.  The map of Pakistan that I initially had thought would be part of the border just did not work, so I have revised and added a tag of Asia from 7 gypsies. The markhor is sitting on the stack at the right, behind the stack on the left is a circle with the flag of Pakistan and behind that is a tag of Asia.  All of the ribbon will not be included on the left side, it is just for my reference.  The Khabuli is situated on an angle between the standing book and stacked books on the left.  Pretty scary huh?  Looking at a design without the color and elements all prettied up, but I promised to document from start to finish, there is always a scary phase to any project, big or small, lol.

Here is a tip for those of you who do design cards and projects, I use my computer and camera a lot to give me feedback, a picture will show you immediately where your glaring mistakes of misproportions are.  Even though the elements are in and appear to be pleasing, I will leave this and walk back and forth throughout the day tweeking and rearranging, lol. However, I think now, that it is basically as it will be.  Now on to the final color choices for the elements and then I will begin with the color for the pages. Well  I am back to work, hope everyone is enjoying their first day of the weekend.  Hugs

Friday, October 26, 2012

Project - thoughts and design

So, the work begins.  After I have done my research and developed a game plan in my head for a card or project, then I proceed to gather my elements, do my backgrounds, etc.  The card size will be 22"X30", which is a full watercolor sheet, I am using 140#, cold pressed hand made paper, 2 sheets.  The wide dimension will be the 22" because it will allow me to do the border on my Cameo with my 12"X24" Cricut mat.  The background for front and back will be one of my spatter backgrounds and I will take pictures and explain the process as I go.  At the bottom of the card will be a boarder made from a map of Pakistan, it will be more of a topigraphical map than a map with cities etc.  On top of the mat will be books, books standing, laying down, and stacked.  There will be a Markhor (the national animal of Pakistan) it is a wonderful, mythological looking goat with the most fabulous goatee you have ever seen.  There will also be a Kabuli Rubab  which is a short necked Lute, it is an instrument played frequently in the NW Region of Pakistan where Malala grew up.  Then from the books will be pages flying upwards twirling and swirling as if in a beautiful gust of wind and the pages will have words on them, dream, learn, teach, love, pray, etc, as many beautiful and motivational words as I can get on the card.  The card will be bound together with book binder's tape and then will be embellished with ribbons.  It appears that one of  Malala's favorite   colors is pink, so the covers will be pinks and white and cream with little undertones of yellow and orange to warm it all up.  Inside the card will be approx. 200 tiny envelopes, each envelope will hold 1 or 2 messages of healing, prayer, and wishes for Malala's full recovery, from anyone and everyone we can get to do one.  So that is it in a nutshell, my plans sometimes grow and change a bit, I am always willing to go with the flow of my designs.  I have always worked with symbols in my design work, no matter whom or what I am designing for, as I work on the project, I have almost a meditative state where I bless the project and the person and persons who will be touched by it. 

The small envelopes are an image from the Silhouette Library that I took the "wave" knife to the top, it represents the oceans that separate us from Malala, I am thinking about putting a dove on each envelope to represent the fact that love has wings and cannot be separated from the giver and receiver.  I have 200 cut, now just need to put them together, lol.

Yesterday was a pretty rough start to the project, anything and everything that could go awry, did.  My blog ran out of picture storage, 2 1/2 hours to fix that because I could not find my Picasa storage but finally did.  Then my printer got food poisoning as I inserted (unknowingly knock off cartridges), oh that was a fun panic as I went to 2 call centers and both wanted big buckaroos to fix, but in the end I got my answers, found a delightful sales person at Office Max, who gave me his card and told me that if the real thing cartridges would not do the job to bring them back and he would refund my money, bless him.  Then a very good friend shared her Chinese food with me, okay, that helped, she is a sweetie. The calls to the call center ran my cell phone minutes down to 90, lol, have told everyone not to call but text message me til I get more, lol.  But my day ended beautifully with a soft knock on my door and when I opened it, there stood my beautiful son and his gorgeous wife and I got hugs that nutured and replenished.

I think it is off to a good start, but the real work has really yet to begin, I am hoping tomorrow, I will be ready to begin the cover process, until then hope everyone has a wonderful Friday and fun fun weekend, hugs

Thursday, October 25, 2012

A Project Begins

A little shopping.

Tuesday, late afternoon I received a phone call from two very special friends down south.  They wanted to know if I would do a project, it involved a 15 year old girl that has been in the news lately (I don't watch the news so I was not familiar with the story), my friend gave me a brief introduction and then told me he wanted a get well card, not just any get well card, the biggest card that I was capable of doing.  Hmmmm.  The girl is Malala Yousafzai, she is from Pakistan and she was targeted for execution by the taliban.  She was shot in the head and neck while returning home from school on a bus.  She was targeted for her outspoken beliefs that all women and girls have the right to an education.  She survived the attempt, a part of her skull had to be removed so that her swelling brain would not be damaged. She is now recouperating in a British hospital, at some time she will go through reconstructive surgery and then extensive re-hab. 

My friend told me not to decide immediately but to think on it and maybe do some research and we would talk on Wednesday.  I was intrigued, I got to work and what an amazing story of this 15 year old. A child, not thinking about what her best friend is wearing to school tomorrow, or if someone likes her, or if she will get to a party next weekend.  This child is trying to figure out how to get the women of her country educated (by the way the country of Pakistan is the 6th largest populated country on our planet), that is a lot of women.

The more I read, the closer I came to realizing, of course I would do this project, and so it is.  I also thought it would be fun to document it from start to finish, that way my friends in Southern CA are able to see the progression for themselves.  I would love for you to join me also, maybe some tips will be shared and always, always, I love your input.

So where do I start, well all good projects begin with shopping, don't they?  Of course you have to have some notes, some color swatches, a few sketches to get you on the right track.

I have 7 pages of research, some color swatches and a couple of starter sketches done, so the work begins.

I will share tomorrow the size of the card, some of thoughts on how the card will be designed, some of the goodies in the bags, so I am off. Have a great day. Hugs

Wednesday, October 24, 2012

Boo-Make it Glitter Please


 Yesterday when Silhouette Library released this little ghostie pattern by Digi Pink Designs, I grabbed it I have all the others in my collection.  I wanted gold glitter paper for the "BOO!" and did not have any, so I decided to see how the DecoArt "Glamour Dust" would do, I used the Gold Glitz and mixed 4 parts of the DecoArt to 1 part Twinkling H2Os and I used Gold Dust and painted an entire sheet of 8.5X11" - 80lb cardstock.  I let it dry and was really happy with the outcome, then the big test was to see how my Cameo handled it.  Liberty did beautifully, no pulling or snagging anywhere.  Because the glitter is infused into the Medium when it dries it does not flake off at all, I wanted a subtle glitz and this worked fine for me, if you wanted a more obvious sparkle you could use another coat or more until you were happy with the results.  It takes it about 35 to 40mins to dry completely.  Photo corners are Cuttlebug dies.
 My camera did not want to pick up the glitter so I had to angle it and then it blurred but I think you can see that it has plenty of sparkle there.
The other thing I like about this is you can write on the paper.  The first boo was done with a Sharpie Ultra fine point marker, the second a ball point pen, 3rd another ball point pen, 4th a micro pen. I definitely like how the sharpie did on this.  If you have a nice supply of H20s your color choices are only limited by your supply.  I also got a bottle of "Champagne" but have not really tried it yet, will let you know when I do.

Have a smooth Wednesday, hugs


Tuesday, October 23, 2012

Cinderellie's Slipper

Happy Tuesday, it is hard to explain, but I will try it this way.  Have you ever done the one thing in life you always wanted to do but only sort of?  Well I feel like that is what I have been doing for the last 11 years until I found the Cameo, don't get me wrong I love what I have done in the last 11 years, I just always knew there was more, lol.   To be able to bring my art to life through the Cameo has been exciting and just more fun than I can ever explain.   I love Fairy Tales and collect them, I have loved them since I was old enough to sit and listen and one of my all time favs, "Cinderella".   Cinderella was first written about in 1634 or there abouts by Giambattista Basiles La gatta Cenerentola and then in 1695 Charles Purrault rewrote it.  While browsing over at Scrapbookgraphics I found a designer Priss Designs, who not only knew the above information but about the differences in the story, the original had fairies and a cat, a dove and threaded slippers, Charles Purrault added the pumpkin, the mice and the glass slipper, she has created this awesome kit and in the kit was my background paper for today.  I love the surrealism look of it and decided to do my own elements to add in, so I did the pumpkin, the mushrooms, the grass border and the glass slipper.  All colored with my Copic markers.  The hardest was the slipper, I did it entirely with B02 and 0 (a lot of 0), first I did a line drawing of the slipper and then I turned it into just a cut file because I did not want any outlines on the cutout.  I positioned it on the steps so I could do a flare out with the sun peeking through the storm clouds shinning on it.  I added some thin wire to the pumpkin for its tendrils, I love big chucky misshaped pumpkins and wanted one that resembled a coach.

Our weather looked like my background all day yesterday as I worked on this. I hope you enjoyed my fun with Cinderellie and that you are off to a great week, hugs

Monday, October 22, 2012

Doodling Debbie's Christmas Ornament

Kicking off Monday with an ornament designed by Doodlingdebbie over at the Silhouette Plus Forum, it was a freebie share, she is just the best.  The card is 5.5"X4.25", the background diamonds are a Silhouette pattern and the photo corners are sizzix.  I cut the ornament in 2 pieces a background cut in black, which I painted with DecoArt "Glamour Dust" - Gold Glitz, 1 tsp Gold Glitz to which I added about 1/8th tsp. of  Twinkling H20 "Sunburst" and mixed very well, you get the glitter look with out the glitter mess.  Then the top piece from a red cardstock and then took my Copics to.  Tied some gold trim for the top of the ornament

Card #2 is for a friend who got engaged in Florence, just how romantic is that?  The background paper is from the Silhouette Library and the other elements are my line drawings, turned into print and cuts.  All coloring was done with Copics. The card is 6"x6".

For anyone wondering why I have not posted to BBTB2, I took the last two week off but will be back next week.  I am trying to catch up with myself, lol.  Have a great week, hugs

Sunday, October 21, 2012

Counting Your Blessings

Sunday blessings everyone.  I could not resist turning some of  my backyard leaves into print n cuts with my Cameo, just scanned them in and cut them out, added a little Copics to pop the veins out.  The background was created using a Crafter's Workshop stencil "Numbers" (a little background pun on Counting your Belssings). The background was embossed with the Cricut Swiss Dots Folder, then I set the stencil into place and airbrushed it, scanned it in and printed it out, so it is just an illusion of being embossed. The tag was done with Tim Holtz Distress Markers and some "Old Paper" Distressing Ink and added a line of ribbon down the side. I love the colors of those leaves.  Have a great Sunday, hugs

Saturday, October 20, 2012

snowy snowy night

Saturday blessing everyone, just a quick pop, I am behind because I have had so much fun with my Cameo this week, every time I use it, it shows me more potential than I ever imagined.  Okay, so Liberty (my Cameo) and I did this card ALL by ourselves.  First I did the wreath with the "Center of Rotation" tool and a picture font, printed it out and took the image to my Copics, I should hide them from myself, lol, cause when I start I just cannot put them down, after I added my color I took some Tim Holtz "Antique Linen" to the area and did some additional distressing to the edges.  Then with my eyedropper tool and my wreath on the Silhouette mat, I selected one of the blues to make my background paper, filled my block and printed it out and then took a mop brush and some gesso and did my snow splats on the card stock, scanned it in, the branch like element is a piece of dark red florist wire that I hammered out and scanned in and then created an element using Liberty and placed it on my cardstock and it was then a finished background piece and I printed that out.  The little snow bird is one of my line drawings and considering how small it is, the time spent coloring it is kinda scary, lol.  I then drew out the tag, scanned it in, had Liberty cut it and more distressing with "Antique Linen, wrote "Merry Christmas" with a pen and nib and some wonderful red oxide ink I found yesterday when playing with my friend Christy at "Hobby Lobby" added some dimentional snow and tied a bow with some jute.  The little star was also hand drawn and colored with Copics. Whew and that about does it for today, hugs

Friday, October 19, 2012

Ridiculously Wonderful Frog


Is this not the most ridiculously wonderful frog ever, I laugh everytime I see him, I may have to do a banner or something with him for my studio, how could you possibly not smile?  This is another "Dawn Inskip" image from her "Ministry of Magic", what oh what am I going to do when Halloween is over?  Background paper is from Silhouette Library and the spider web and itsy bitsy is from a clear stamp set from Hobby Lobby.  The ticket and word tag is also from Ministry of Magic.  I did  a little bit of Tim Holtz distressing but did not add Copics this time.  All cuts done with that super duper Cameo, hugs

Wednesday, October 17, 2012

Play Date Cafe - Blog Anniversary


Good Morning everyone, well on the Pacific Coast it is still 9PM and Play Date Cafe is way over there on the East Coast chiming in a new day.

Today I am sharing a project with you as an Alumni Guest Designer over at The Play Date Cafe Color Challenge.  Most of you know how much I love color and I loved my time with the Fab Julie and The Play Date Cafe Color Challenge.  They are celebrating their 3rd Anniversary (that is scary, I just want to know where those 3 years went) with a BIG celebration!  The PDCC has always been a unique challenge for two reasons.  They encourage you as a player to interpret the colors as YOU see them and they welcome pretty much ANY type of project from cards to layouts, knit, crochet & sewing, mixed-media and even cupcakes!

From October 18-22, you will enjoy inspiration from other returning design team members as well as the current team, prizes from a variety of sponsors and additional giveaways for becoming a follower of their challenge blog and for displaying their brand new badges.

I hope you will join me in congratulating The Play Date Cafe by playing along and sharing your support by saying hello when you pay a visit.  It's going to be an exciting celebration!

Since being a team member with PDCC I have been busy and done a lot, the biggest change in my life has been the addition of the Silhouette Cameo and oh how I have grown with this marvelous cutter.  My card today is a celebration and congrats to the PDCC for 3 years of inspiration and fun from "The Wish Fairy" a scrapbook digi from "Scrapbookgraphics.com" designer "Dawn Inskip" from her "Wish Kt", I love love this wish fairy and Dawn's beautiful work. The background paper was created using Dawn's snowflake from her "Frozen Kit", I layered them on a block and adhered to my cardstock, in the glorious colors of our challenge.  Photocorners are by EKSuccess. I wish Julie and the PDCC at least 3 more years of riotous fun and inspiration and I thank her for including me in this great celebration.

Hugs everyone.

A Christmas Wreath


Good Morning, yesterday our resident guru at the Silhouette Plus Forum "Doodlingdebbie" did a tutorial showing us how to use the new tools from the Silhouette Design Studio Software and my lightbulbs went "on", lol.  The new tools are:  The Center of Rotation, The Properties Eye Dropper and the Grid Lines.  My card this morning is using the "Center of Rotation", what a cool tool.  I took the two Hero Arts "Leaf Prints", #32660 from the Silhouette Library to form my wreath, I added Merry Christmas with the text tool, I color filled and when I printed it out and then created a print n cut and I cut it out with my Cameo.  I was not that happy with the color, so took my Copic markers to the printout and then added some doodles with my Marvey White Pen.  I added ribbon and the little bell also from the Silhouette Library and it was that easy.  So if you are wondering how to use those new tools, pop over to Debbies Blog and take a look.  Have a great Wednesday, hugs

Tuesday, October 16, 2012

A Hodge Podge

 One of the first things I do on Tuesday is to check the Silhouette Library to see what new designs have been added and what the free shape of the week is.  I loved this little recipe box, in the library it has a spoon with the words recipe, so I took those out and just cut the box.  Then had some fun with my "Dylusion" dies and a tea bag, first I spritzed the colors "London Blue", "Pure Sunshine" and "Squeezed Orange", then sprayed it with a little rubbing alcohol, gets those little molecules dancin lay the box down and just squash it around, then I spritz a black tea bag with a little "Fresh Lime" and just dab it around.
 I love this bottle and label so put it on the back and on the right side will be a tag with the recipient's name.
 the little box will hold 40 index cards.  I love blending essential oils and I love using them on their own and often share with friends and family.  A week does not pass that someone will email me and say "what oil do you use for so and so?", so I am going to write down my most favorite oils with descriptions of what they are best used for.  Here's a good one, lavendar essential oil is credited for saving the lives of thousands during the outbreak of the plague in Paris, they washed the streets with it.  Up until 1907 the floors of the slaughter houses in Chicago were washed down at night with Lavendar.  It is one of my top 10 favorites.
This is the freebie of the week, it is a print n cut and just makes up the cutest card all on its' own with nary an embellishment, I did add a little flourish ribbon on the right side.  So, that's it, hope your day is a creative one, hugs

Monday, October 15, 2012

Thanksgiving Blessings

Happy Monday, everyone.  I made a committment to do some Thanksgiving cards for a  Seniors Care Facility and worked on those this weekend.  Kay on the Silhouette Forum shared a pumpkin sketch with us, so I loaded my pen into the Silhouette and sent the Cameo to work sketching.  This is a single card meaning it does not open there is the front and then the back is for the sentiment. The sketch is mounted to cardstock which creates a small border for the front.  I first did my coloring using my Copic Markers and then did a light air brushing around the card leaving some highlight area.

On the back I doodled in a frame and added a small leaf from a Martha Stewart Punch.  Overall size is 6.5X4.35.  Have a great week, hugs

How in the world can you beat a Monday morning begining with this, we are on the receiving end of gorgeous here, look at that color and the picture does not even capture half of it, blessings everyone.

Sunday, October 14, 2012

Friend


Here is the inside of card.


Happy Sunday, I had a play with a new digi set from Dawn Inskip, it is called "Charley and Pip", is that not the cutest hefferlump? Ever!  All elements are from the kit, the flower I cut apart and rebuilt on a pop dot to give it dimension and then added some glitter.  The background paper I created using "Dylusion" inks from Ranger "Bubble Gum Pink" and "Pure Sunshine", I wanted it to look like the reflected background lights from the Big Top, The border was double cut and just ran some baker's twine through it and die with a bow.
I also touched up the images with some Copic markers to add some shadows.  Inside it says "There you are sitting all by yourself watching the show and up pops a friend".  Hope the rest of your weekend is blessed, hugs

Just an fyi these digis come precolored in the scrapbook kits, which is one of the things that makes them so great, a card goes together really fast, I do do some additional highlights and shadows though.  I just don't want to take credit for the fabulous work of Dawn Inskip. Hugs

Thursday, October 11, 2012

Jacobs Autograph book

 And here is Jacobs autograph and coloring book.  He is so into the "Cars", his two favorite characters are Lightning McQueer and Mater.  Background paper on this is Sil Library. 
 here is Mater
 the embellishments for his signage pages
 these are his thank you tickets.
Jacobs coloring book, backgound patterns Sil.
 Again, Lightning McQueen.  I was sooo tired as I was finishing up and I punched the wrong side of the paper, lol, I did not have time to do them over so I turned it into an activity project and included string so he could practice on knots.
His stickers and the string.  Thanks for visiting, hugs

Surprises of the Best Kind

Good Morning everyone, today is a very special day for two young children and they do not even have a clue yet, oh I love surprises, don't you?  I have known the kids across the street since they arrived on planet earth.  What fun it has been to watch them grow and go through phases.  They are bright, sweet, loving and this afternoon as their parents put them in the car they will find out they are going to Disneyland,  Jacob has been but Taylor has not, I would love to be a fly on the wall as Jacob explains to his sister all the ins a outs of Disneyland.  I told their mother that I would do autograph books for this wonderful adventure. This post is very picture heavy so today I will do two posts in order to share with you the autograph books. One post for Taylor and then one for her brother's autograph book.

I wanted them to be easy and fun to use, the covers are constructed from chipboard and then overlaid with pattern paper.  The Silhouette was a champion in the entire process, it is a workhorse.  I found Tinkerbell in a coloring book, I scanned it in and printed it out and then used Copics to color her in, the "autograph" is part of an image from the Silhouette Library, I removed it from its other pieces to use on its own and then airbrushed it with Copics.

The inside is nothing more than a series of pockets with a long card blank inserted inside the pocket it was perforated (by the Silhouette) and folds over the top of the pocket.  When the holes are punched for the ring binders this secures the long piece into the pocket which created two pockets one inside the flap and one on the backside, I hav found children like kittens love hiddy holes.  On the top flap of the first page I positioned Taylor's favorite character, Tinkerbell, added some stitching rub-ons and a little sprig to accent the one in Tink's hair. This pockets deliver three places for the Disney Characters to autograph, the top flap, the inside flap, the pocket itself and the back of the pocket, so 5 pages and 20 or more autographs easily.
Inside each pocket I have tucked 8 tickets, 40 in all that, these can be shared with the characters as a thank you, a waitress or waiter or anyone met at the park, Taylors has the Tink bust on the front and the back of the ticket is below.
 This is the back of the ticket stamped with a StampinUp circle thank you stamp.  The autograph book is closed using two of the plastic stick on (sale rack positioners), I inherited these when our local "Paper Zone" closed, I loved working there and still miss it.  I then took a lanyard, I purchased from Office Depot, I cut it top, middle, then with a lighter I singed the ends and used beads to create an adjustable closure, the book is attached to the end clasp that was meant to hold a badge or name identification plate.  You can see that in the first picture.
As sometimes happens, I got carried away and also did an activity, color book for each of them.  It is just a rough construction of chipboard with pattern paper and wired binding.  Inside are coloring pages. 
Of course Taylor's is all about Tink and her friends, the back pages were left blank, and stickers were enclosed so they can create their own stories and fun.
This is the sticker packet, Taylor is just getting to know Barbie.

So then the issue of how does all of this get presented, lol, I found these cute little totes at the Dollar Tree, cut their initials from vinyl, it is not heat treated, so they have been adhered with the help of tacky glue, I hope they stay where they were put, at least for the trip.  So if each of you today who visits, will say a little prayer for safe journey and blessed family memories, I would sooo appreciate it.  Thanks for visiting and have a grand ole day. Hugs